Last month a friend gave me a book she'd bought for herself on starting seeds, saying "I'll never actually get to this."
I see her point. Coming in at 386 pages, it's a loooong book! Who has time for that?
If you have to digest 386 pages of information to be successful at starting seeds, why even try? I totally don't blame her for saying "nevermind."
I've written a much shorter seed starting handbook, which you can download here for free. It's only 12 pages (and one of those is the table of contents). But as a parent, running a business, and a household, I know that even 12 pages can be too much!
So, here is the super abbreviated guide to starting your garden from seeds.
And to honor your time, here's the *time* breakdown of what it will take to start your garden from seed this year:
- Read this post: 10 minutes
- Download and print the free simple 2-page planner: 5 minutes
- Talk with an experienced gardener about seeds and timing: 15-30 minutes. (It may take some time to find the right person!)
- Gather your seeds, gear and supplies: Highly variable! A fast option (10 minutes online) is our Food Security Beginner's Seed Starting kit that includes a self-watering pot, seeds and soil. You provide grow lights (Amazon is the easy option) or sunshine, and water. A trip to your local nursery should do it also. (1 hour). Of course you can shop endlessly . . . That's up to you!
- Plant and label seeds: 30 minutes - 1 hour
- Tend: 5 minutes a day (regular pots where you hand water) or 5 minutes a week with Orta Self-Watering pots for about 6 weeks.
- Transplant - the same amount of time as transplanting nursery starts!
Total time: 1.5 to 3 hours planning and planting + 30 minutes to 3.5 hours hands-on tending time over 6 weeks.
Part 1: Why bother with seeds?
- Because you'll save tons of money instead of buying starts or the fully grown vegetable themselves.
- It makes an excellent project with kids, and they'll learn where food comes from. You have to look after them anyway, why not grow some seedlings while you're at it?
- It's totally magic and satisfying, and connects you to generations of ancestors who stewarded seed for us and our grandchildren.
Part 2: What seeds should I plant?
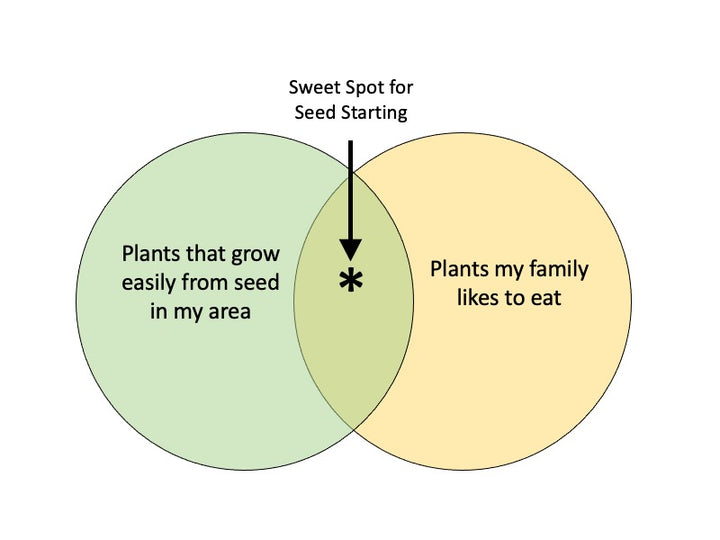
The fastest shortcut to figuring out what seeds to start is to follow this diagram:

The list of plants your family likes to eat is probably pretty easy.
"Plants that grow easily from seed in my area"? Less so. Here are my best shortcuts for figuring that out:
- Ask at your favorite nursery. Make sure to find someone who grows their own garden from seed, at least sometimes.
- Ask neighbors who garden. There's probably someone near you already growing from seed. As a bonus, they probably have extra seeds! Most gardeners do, and love to share. :)
- Ask at the farmer's market. They *definitely* grow from seed for the economics of it. They'll know the nuances of what you can and can't grow locally.
- Garden clubs, neighborhood Facebook groups, and perhaps even your local library can help you find local seed-starting intel.
Part 3: When do I start the seeds?
This is the trickiest and also most forgiving step.
I know a market gardener in Marrakesh who starts all his seeds every 2 weeks year round because he never knows when he'll have unseasonable cold or heat. He loses lots of plants, but enough survive. If you have a lot of planting space, you can definitely take that approach and ignore timing altogether.
Here is another way:
- Download this free planting chart.
- On page 2 (the blank one), put the list of seeds you'd like to grow down the left column.
- Decide when you'd like to transplant those seeds outside.
- For all the seeds that say "cool," transplant them in early spring or late summer, so they do most of their growing in cool weather
- For all the seeds that say "warm," transplant them in late spring / early summer so they do most of their growing in warm weather.
- Ask your gardening friends when they usually transplant and copy them! (You could even take the chart with you and have them help you fill it out - With an experienced local gardener, it will take 10 minutes!)
Part 4: How do I care for seedlings? Isn't it tricky?
Seedlings can be tricky, but they don't have to be.
With the right gear, it's pretty straightforward.
Gear you need:
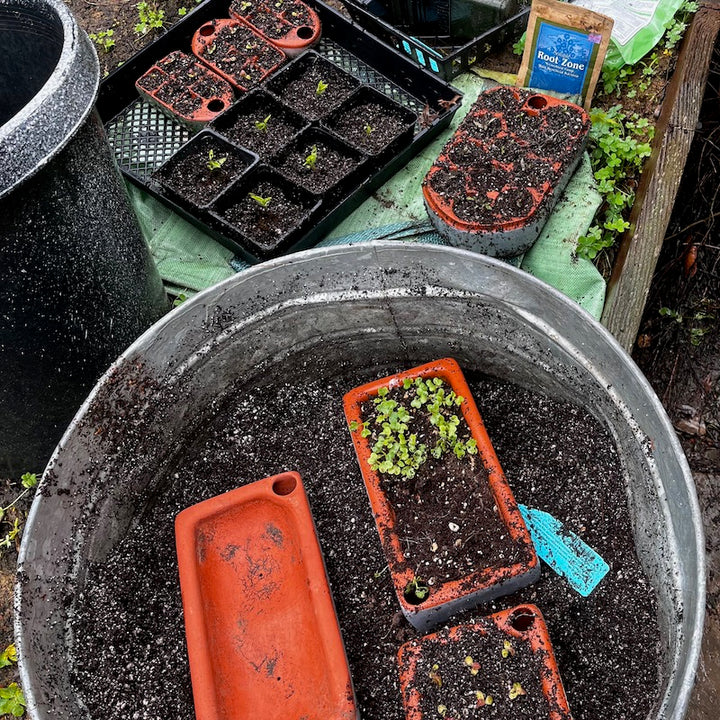
- Seed pots. We make self-watering seed pots that make the watering foolproof. (If you sign up for the newsletter below, we'll even send you an introductory coupon!). But you don't have to buy anything! Any container with drainage holes will work to start seeds, as long as it's a food safe material.
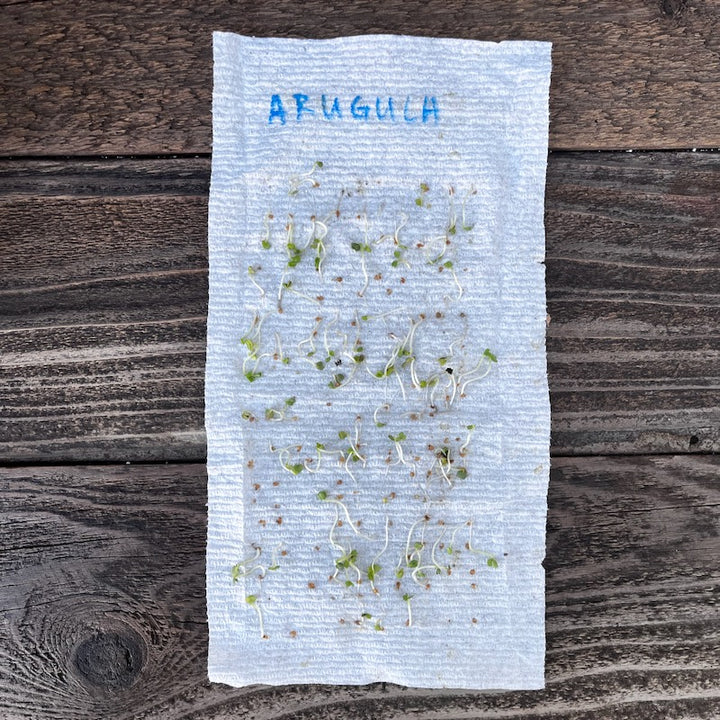
- Seed-starting mix. Similar to potting mix, but with a finer texture. Those tiny baby roots need small bits of material to hold onto. We sell seed starting mix here. You can also get seed starting mix at most nurseries. And here is a video showing my homemade recipe for seed starting mix.
- Light! You need lots more light than you think! Grow lights are a must, unless you have a greenhouse or a window ledge that gets 8-10 hours of direct sunlight every day. Seriously, this is one of the biggest beginner mistakes. You need lots of light or the seedlings get "leggy," weak and wobbly as they seek more light.
Planting:
- Plant your seeds in the seed mix at the depth indicated on the seed packet. (Or according to the internet if the seed packet doesn't say one way or the other.)
- Water them very gently to make sure the seeds and soil are in good contact.
- Leave them to grow. (with lots of light!!)
- Keep them evenly moist throughout their germination and seedling stage. The seed mix should stay at about the texture of a wrung out sponge. With self-watering pots, you fill the reservoir once a week. Otherwise, water gently every day, but not so much as to get the soil soggy.
- Thin seedlings so that you only have one baby plant per ~2" x ~2" square, or one per pocket if you have divided seed pots. Otherwise they'll crowd one another
- When seedlings have 2-4 sets of leaves, they're ready to transplant. You can either transplant directly to garden beds, or to bigger intermediate pots.
After that treat your transplanted veggies just like starts you would otherwise buy at the nursery. And pat yourself on the back for doing it yourself! :)
Of course, because there are literally 386 page books about seed starting, there are, oh, about 384 pages worth of information I've left out. But this is enough to get started and to avoid most of the common pitfalls of beginning seed starting.
Happy Growing!
Would you like seed starting tips direct to your inbox? I write a very reliable weekly newsletter - updated more frequently than the blog!